Notebooks#
Computational notebooks are an alternative interface to the traditional terminal to access and use the HPC. We provide a notebook platform integrated with our Tier-2 HPC cluster (Hydra) at notebooks.hpc.vub.be. This platform is based on the popular Jupyter project and allows to manage and launch your notebooks directly on the HPC from a JupyterLab environment.
Access to the notebook platform#
All VSC users can use the notebook platform of VUB-HPC. The same access policies apply to request a new VSC account to use the notebook platform than the regular terminal interface.
Access to the notebook platform does not require the upload of any SSH key to your VSC account. This means that if you will only use the HPC through the notebook interface, the process of creating your VSC account is much simpler and you can skip all steps related to the creation and upload of the SSH key. This can be specially useful for teaching, as students carrying out exercises on the HPC can now create their VSC accounts and access the cluster entirely from the web browser.
Once you log in to notebooks.hpc.vub.be, the following screen will request read access to your VSC account:
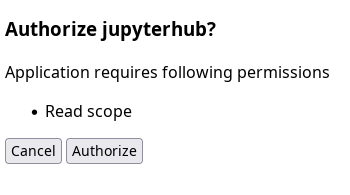
Request to get read access to your VSC account.#
Click on Authorize and you will be automatically redirected to the notebook platform.
Computational resources#
Once you log in to notebooks.hpc.vub.be, you will be presented with a control panel to select the computational resources required by your notebooks.
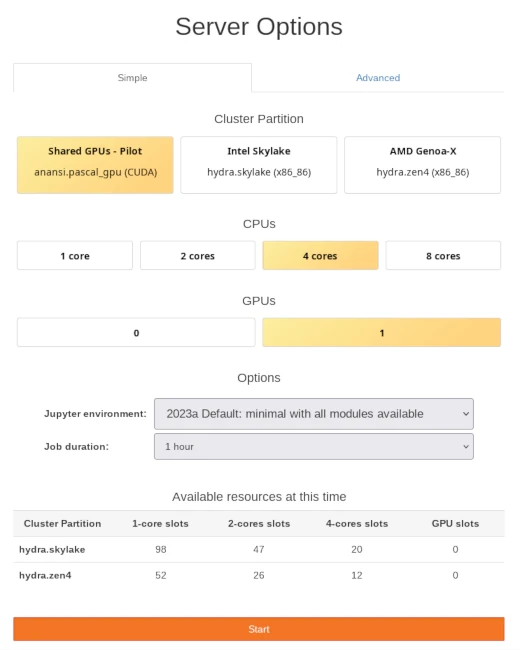
Control panel with simple selection of computational resources for notebook session.#
The notebook platform allows to launch JupyterLab environments directly on the Tier-2 HPC clusters of VUB:
The Shared GPUs of the Anansi cluster are specifically designed for interactive workloads like notebooks. Maximum session time is 12 hours and its resources have better availability thanks to its non-exclusive policy, where CPU cores and GPUs can be shared among jobs. However, keep in mind that the resources of Anansi are not the most powerful.
Intel Skylake and AMD Genoa-X are non-GPU partitions in the Hydra cluster with top of the line CPUs. Hydra is the main HPC cluster in VUB and provides the most powerful CPUs and GPUs. Your notebooks will get dedicated resources, avoiding any disturbance from other users and ensuring the reliability of its performance. However, resources in Hydra might not be always available, keep in mind to check the Available resources table at the bottom of the control panel.
The options on this panel are tuned for interactive use of notebooks and is smaller than those of regular jobs. Maximum session time is limited to 12 hours on all partitions and amount of CPU cores is limited to 25% of a single node. These restrictions fit well in one day of work running multiple notebooks and help to avoid unnecessary queue time.
If you need different or extra resources, the Advanced tab of the control
panel offers more control. You will find a menu on it with almost all
VSCdocHydra’s partitions.
You can start your JupyterLab session on generic compute nodes, or on a
dedicated GPU in the pascal_gpu partition, or even on multiple nodes with
the fast InfiniBand interconnect of the skylake_mpi partition. The only
limitation are the Nvidia Ampere GPUs, which are left out of the pool of
resources for notebooks as they are already in very high demand by regular
computational jobs.
Jupyter environment#
The main work environment provided by the notebook platform is JupyterLab. If you are not familiar with it, please check its official documentation at jupyterlab.readthedocs.io
You will find several options in the menu Jupyter environment of the resource selection panel. All the options will launch a JupyterLab interface running on the HPC, integrated with the software module system and with all notebook kernels available. The differences between these lab environments concern:
version of Python and JupyterLab used in the environment
pre-installed lab extensions
available software modules (software toolchain)
Users are not allowed to install JupyterLab extensions on their own, those are managed by VUB-HPC. Therefore, you will typically find a default environment of the lab with just the software module extension plus some others environments with extra extensions.
Environments are found in the menu Jupyter environment where they are grouped by their Python version. You might find multiple versions of the same environment, which differ in the year of their creation and will use older or newer software modules. We typically provide the following environments:
- Default: minimal with all modules available
This is a default JupyterLab environment without any extensions beyond the integration with the module system of the HPC. It uses modules in the corresponding year toolchains and the indicated version of Python for the kernel of its Python notebooks. All other notebook kernels can be loaded on-demand through the module system.
- DataScience: SciPy-bundle + matplotlib + dask
Default JupyterLab environment with pre-loaded data science Python packages such as numpy, scipy, pandas and matplotlib; plus the capability to display in your notebooks interactive graphs with matplotlib and an integrated Dask dashboard to manage and monitor your workflows with Dask.
- Molecules: DataScience + nglview + 3Dmol
DataScience JupyterLab environment plus the nglview and 3Dmol lab extensions to visualize molecular structures in 3D.
- RStudio with R
Default JupyterLab environment plus a pre-loaded R kernel and a lab extension to launch RStudio from within the lab interface.
- MATLAB
Default JupyterLab environment plus a pre-loaded MATLAB kernel and a lab extension to launch MATLAB Desktop from within the lab interface.
File browsing#
JupyterLab and notebooks will be launched from
your VSC_DATA storage by default. You can change this
starting location in the configuration file of jupyter-server,
which is located in your home directory at ~/.jupyter/jupyter_server_config.py.
You can create this file with the contents below or add the ServerApp.root_dir
and ContentsManager.root_dir settings to an existing one.
jupyter_server_config.py to change starting location of JupyterLab to VSC_SCRATCH#1# Configuration file for jupyter-server.
2import os
3c = get_config() #noqa
4
5## Starting directory for lab, notebooks and kernels.
6c.ServerApp.root_dir = os.environ['VSC_SCRATCH']
7c.ContentsManager.root_dir = os.environ['VSC_SCRATCH']
Regardless of your starting directory in the lab, you can access all your files
and folders in the HPC from your notebooks. We recommend to move around your
personal storage partitions and those of your Virtual Organization (VO) by relying on the
environment variables $VSC_HOME, $VSC_DATA, $VSC_SCRATCH and their
variants for VOs. See below for an example:
import os

vsc_scratch = os.environ['VSC_SCRATCH']

# change current working directory
os.chdir(vsc_scratch)

# open file by absolute path
filename = os.path.join(vsc_scratch, 'some_folder', 'some_data.txt')
with open(filename) as f:
    content = f.readlines()
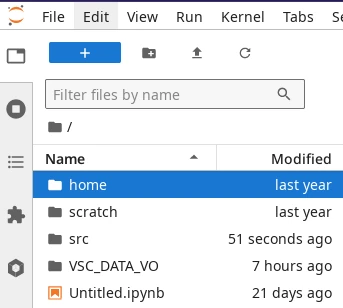
File browser in JupyterLab.#
The file browser in JupyterLab can be accessed through the tab on
the left panel (see screenshot on the right). This file browser can be used to
navigate your starting location (VSC_DATA by default) and all its
sub-folders, but it does not allow to jump to other storage partitions.
You can open notebooks in any storage partition in Hydra from the menu File > Open from Path…. A pop-up will open where you can write the absolute path to the notebook file.
Alternatively, you can use symbolic links to quickly access any other storage
from the file browser of the lab. Symbolic links are a feature of the
underlying Linux system that allows to link any existing file or folder from
any location. You can create new symbolic links from a Linux shell on the HPC
by using the ln -s command. The screenshot on the right shows the resulting
home and scratch symbolic links on VSC_DATA from the commands
below:
VSC_DATA to your scratch and home#ln -s $VSC_SCRATCH $VSC_DATA/scratch
ln -s $VSC_HOME $VSC_DATA/home
Software modules#
The JupyterLab environment launched by the notebook platform is integrated with the software module system in the HPC. This means that you can load and use in your notebooks the same software packages used in your computational jobs.
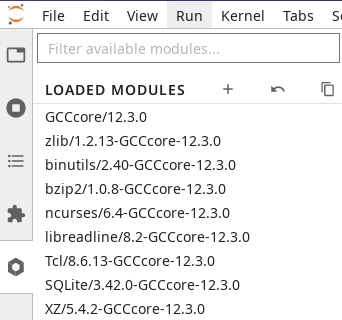
Module tab in JupyterLab.#
You can load software modules from the tab with a hexagon icon on the left panel of JupyterLab. This tab opens a list of loaded modules followed by a list of available modules.
Upon launch, the list of loaded modules will already show some modules loaded by JupyterLab itself. For instance, you will always see a module of Python loaded which determines the version of Python of the kernel used by your Python notebooks on this session.
Warning
Modules already loaded when your JupyterLab environment starts are necessary for the correct function of the lab and notebooks. They should not be unloaded.
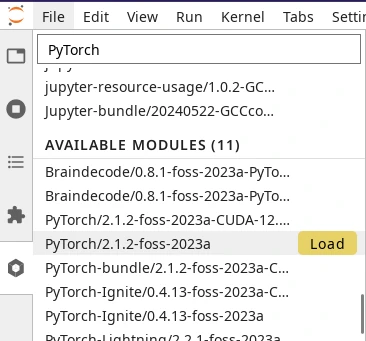
Loading a module from the module tab in JupyterLab.#
Below loaded modules, you will find the list of available modules that can be loaded on-demand. Point your cursor to the right of the module name and a Load button will appear (see screenshot on the right). All modules shown in the list are compatible with each other, so you can load any combination of modules.
All available JupyterLab environments use a single module toolchain. You can select the toolchain of your JupyterLab session on launch from the resource selection panel. The menu Jupyter environment lists the available environments indicating the Python version and the generation of its toolchain.
Note
Any change to the list of loaded modules requires rebooting the kernel of any open notebook. After loading/unloading modules, click on the top-right button of the notebook toolbar, labelled Python 3 (ipykernel) in the screenshot below, and re-select your notebook kernel from the menu.

Notebook toolbar.#
Notebook kernels#
The following table shows the notebook kernels available in all JupyterLab environments of this platform and the corresponding modules that have to be loaded to enable them:
Notebook Kernel |
Software Module |
|---|---|
Python |
(loaded by default) |
R |
IRkernel |
Julia |
IJulia |
MATLAB |
jupyter-matlab-proxy + MATLAB |
The default lab environment only loads the Python kernel on launch. You can activate any other kernel by loading its corresponding software module. Once a module providing a new kernel is loaded, a new icon will automatically appear on your lab launcher to start a notebook with that kernel.
Some specific Jupyter environments have extra kernels already loaded by
default, for instance RStudio with R environments also load IRkernel
rendering notebooks with R readily available on it.
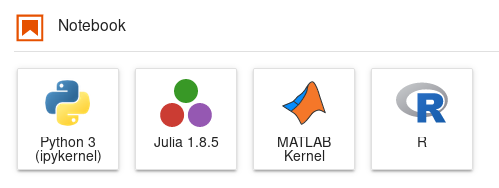
Launchers for notebooks for Python, Julia, MATLAB and R.#
TensorBoard#
You can start TensorBoard from within your notebooks in all Jupyter environments of the notebook platform.
Load the tensorboard software module using the module panel. Make sure that it is loaded last to avoid conflicts.
Reboot the kernel of any open notebook
Load the TensorBoard extension in your notebook
%load_ext tensorboard
Launch the TensorBoard panel using some existing logs
%tensorboard --logdir /path/to/directory/with/logs
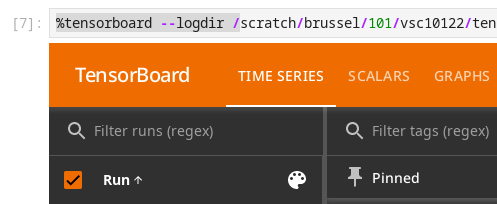
TensorBoard running in a Jupyter notebook#
See also
Official guide Using TensorBoard in Notebooks
RStudio#
You can launch RStudio from the notebook platform. This environment is specific to the R language. If you are not familiar with it, please check its documentation site at education.rstudio.com.
RStudio is available through any Jupyter environment with RStudio in its name. Launching any of these environments will start a JupyerLab with the R kernel readily available for your notebooks and a launcher for RStudio.

Launchers of Python notebook, R notebook and R Studio.#
MATLAB#
The Desktop interface of MATLAB is available on the notebook platform as well. This graphical interface is analog to MATLAB Desktop but it works on the web browser. If you are not familiar with this environment, please check its documentation site at mathworks.com/help/matlab.
MATLAB Desktop is available through any Jupyter environment with MATLAB in its name. Launching these environments will start a JupyterLab with the MATLAB kernel readily available for your notebooks and a launcher for MATLAB Desktop.
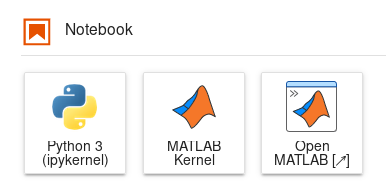
Launchers of Python notebook, MATLAB notebook and MATLAB Desktop.#
Visual Studio Code#
Visual Studio Code (VS Code) can be used on the HPC through the notebook platform. There are two different methods to achieve such integration, the most effective one is running VS Code on the compute nodes from your browser, which allows to do any kind of development directly on the HPC. Alternatively, it is also possible to use VS Code in your personal computer to run notebooks remotely on the HPC.
Launching VS Code on the HPC#
Recommended All Jupyter environments in our notebook platform provide the option to launch VS Code on the HPC and use it directly from your browser. You will find the VS Code application in the launcher tab of JupyterLab.
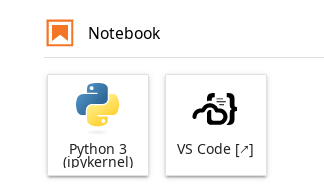
Launcher of VS Code next to default Python notebook launcher.#
Once launched, VS Code will start on a new tab of your browser and use the same computational resources allocated to your notebook session. This means that you can use the powerful CPUs and GPUs of the HPC and also easily access all your data stored in the cluster.
Note
Load any software modules before launching VS Code if you need to use any additional software not loaded by default.
The VS Code application on the notebook platform is totally independent to any
VS Code you might have installed in your personal computer, which is helpful to
tune its configuration specifically for the tasks needed on the HPC. By
default, VS Code extensions and other data files will be stored inside the
folder ~/.local/share/code-server in your $VSC_HOME directory. If your
setup requires extensive use of extensions, the
quota of your home directory might become a limitation,
in such a case you can move that folder to $VSC_SCRATCH and link it back:
mv ~/.local/share/code-server $VSC_SCRATCH/code-server
ln -s $VSC_SCRATCH/code-server ~/.local/share/code-server
Process notebook remotely on the HPC#
An alternative approach to the previous section is to use the VS Code application in your personal computer to work on a local notebook file, but use the HPC cluster do the heavy lifting of processing the cells in it. Therefore, all data processing happens remotely on the HPC (i.e. using Python modules in the cluster and data from files in the cluster), but the graphical interface is handled locally by your VS Code application.
Remotely connecting to the cluster to process notebook cells requires the JupyterHub extension for VS Code. Once this extension is installed in your computer, you can follow the next steps:
Start a new session in notebooks.hpc.vub.be as usual. The resources of this session will be the ones used to process your local notebook.
Load any software modules needed to process the cells in your notebook.
Go to
https://notebooks.hpc.vub.be/hub/tokento generate a new access token for VS Code. Write vscode as Note and set the expiration to 1 Day. Then click the button Request new API token. An alphanumeric code will appear on this page. Leave it open.
Panel to generate new access token for VS Code application.#
Change the notebook kernel to an Existing JupyterHub Server
Paste the URL from your opened notebook session as remote URL of the remote JupyterHub server. It is of the form
https://notebooks.hpc.vub.be/user/vsc00000/lab.Enter your VSC ID as username.
Enter the alphanumeric code from step 3 as access token.
Name the new server configuration as VUB HPC for instance.
The cells of your notebook will now be executed on your open notebook session on the HPC.
Custom Python environments#
You can use Python virtual environments to generate custom kernels for your notebooks. Virtual environments provide a layer of isolation allowing users to install additional Python packages on top of the software modules without conflicts. Each of your virtual environments can be added as a new kernel for your notebooks and launched from the lab interface.
The main step in adding a new kernel to your JupyterLab environment from one of your virtual environments is to create the virtual environment itself.
Start a new session in notebooks.hpc.vub.be in the cluster partition and with the Jupyter environment of choice
Note
Software installed in virtual environments will only work in the cluster partition and Jupyter environment used for its creation.
Open the Terminal from your lab interface
Follow the instructions in Python virtual environments to create a new virtual environment and install any Python packages in it. Keep in mind that loading the Python module is not necessary as that is already done by the JupyterLab session. This new virtual environment can be placed anywhere you like in the storage of the cluster.
Example sequence of commands to create a new virtual environment in the directorymyenv#$ python -m venv myenv --system-site-packages $ source myenv/bin/activate (myenv) $ (myenv) $ python -m pip install --upgrade pip (myenv) $ python -m pip install <insert_cool_package>
Add your new virtual environment as a new Jupyter kernel (from the same terminal shell)
$ python -m ipykernel install --user --name=myenv
A new launcher will appear in the lab interface to start notebooks using this new virtual environment
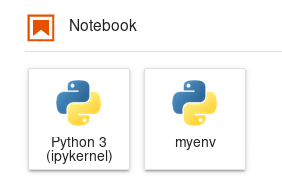
Launchers of standard Python notebook and custom Python kernel from virtual environment#
Note
Whenever you want to reuse your existing virtual environments in the lab, keep in mind to load any software modules used in its creation beforehand.
Jupyter extension manager#
Extensions for JupyterLab are installed and managed by the SDC team. You will find the list of available extensions in the extension tab on the left panel (puzzle piece icon) and you can enable or disable any of them. Different Jupyter environments provide different extensions and those are only available in their corresponding environments.
The store of Jupyter extensions is disabled on the notebook platform as the available extensions for download on the store are unreviewed and they can contain malicious or malfunctioning software. If you need any Jupyter extension not yet available on the notebook platform, please contact VUB-HPC Support.