2. Graphical applications#
For best performance and ease of use, we recommend running graphical applications via the VUB Ondemand web portal.
Alternatively, 2 more methods are available:
2.1. X11 forwarding#
X11 forwarding is the simplest solution, but also the slowest. This option is suitable for applications with minimal graphical requirements.
Linux and MacOS
Users can enable X11 forwarding upon login by adding the option
-Yto thesshcommand:ssh -Y vsc10xxx@login.hpc.vub.be
Windows
Users can take advantage of the built-in X11 support in MobaXterm, see VSCdocSetup MobaXterm. By default X11 forwarding is enabled; you can check this setting under the Advanced SSH settings tab in the SSH Session settings window.
After login, you can test whether X11 is enabled by running the command
xclock in the login node. If it works, a clock will be displayed in a new
window. Please keep in mind that the login node is restricted to graphical
applications that perform non-intensive compute tasks, such as visualization
tools.
Compute intensive graphical apps should be executed in a compute node. This can
be achieved by starting an interactive job and adding the option --x11 to
the srun command:
srun --x11 --pty bash -l
Tip
To avoid having to keep your SSH connection active for the duration of the interactive job, you can submit your interactive job in a tmux session.
2.2. Remote desktop sharing#
Alert Setting up remote desktop sharing is a complex multi-step process, recommended only for advanced users.
For applications that are graphics-heavy we provide an alternative solution to X11 forwarding that is more efficient, called Virtual Network Computing (VNC). The steps are outlined below.
Create a VNC password
The VNC password should be created only once and it will be used in all future connections to your VNC sessions in Hydra. Type the following command to set the password:
vncpasswd
When asked about a view-only password, reply no. The entered password is obfuscated and stored by default in the file
~/.vnc/passwd.Start a VNC server
The following command starts a VNC server inside a job in a compute node. Adapt the requested resources and the screen resolution as needed:
sbatch -t 12:0:0 -J VNC -e VNC.err --wrap "vncserver -geometry 1600x900 -fg"
Verify that the VNC server has successfully started
Once the VNC job has started, look for a line that starts with ‘New’ in your job error file (
VNC.err):grep '^New' VNC.err
If your VNC session is running, then a line similar to the following should be shown:
1$ grep '^New' VNC.err
2New 'node379.hydra.os:1 (vsc10xxx)' desktop is node379.hydra.os:1
Take note of the
compute nodeand thedisplay numberof your VNC session, which will be needed in the next steps. In the example above withnode379.hydra.os:1, we have:compute node: node379.hydra.os
display number: 1
Start a VNC client in your local computer
Linux and macOS
Linux and macOS users can use TigerVNC from the command line, which allows connecting via the gateway (the login node) in a single command. Linux users can install it via their package manager; macOS users can install it via Homebrew.
Adapt the following command: replace node379.hydra.os:1 with the compute node and display number of your VNC session:
vncviewer node379.hydra.os:1 -via vsc10xxx@login.hpc.vub.be -maximize
A new window asking your password should pop up. Enter your VNC server password. The VNC session should now appear in a new window.
Windows
Windows users can use the VNC client that is included in recent MobaXterm versions.
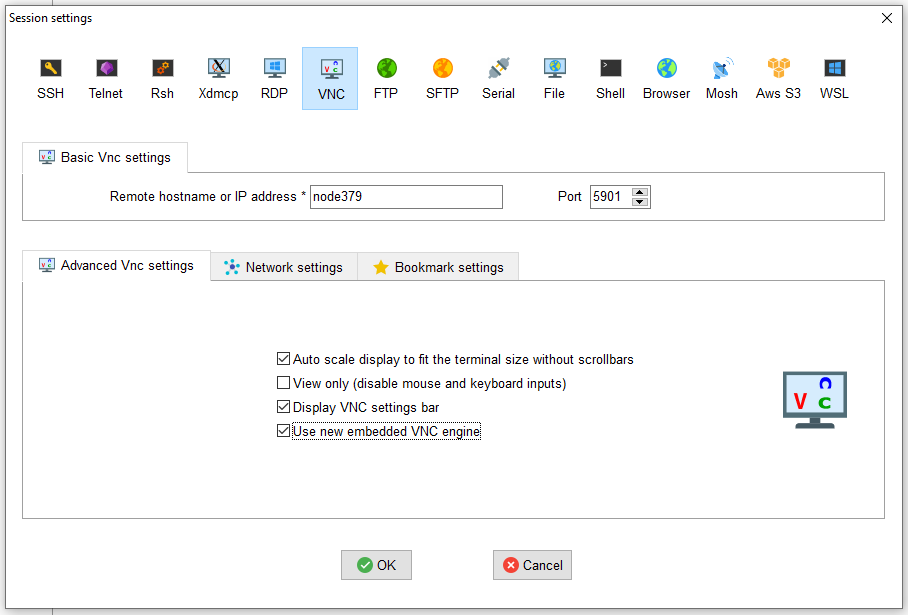
Click icon
Sessionin the top toolbar to create a new session. A new Session settings window should pop up:
Click icon
VNCin the top toolbar.Under
Basic VNC settings, fill out:Remote hostname or IP address: node379.hydra.os (replace with the compute node of your VNC job)Port: 5901 (replace with the sum of 5900 and the display number of your VNC session)
Click tab
Advanced settingsand checkUse new embedded VNC engine.Click tab
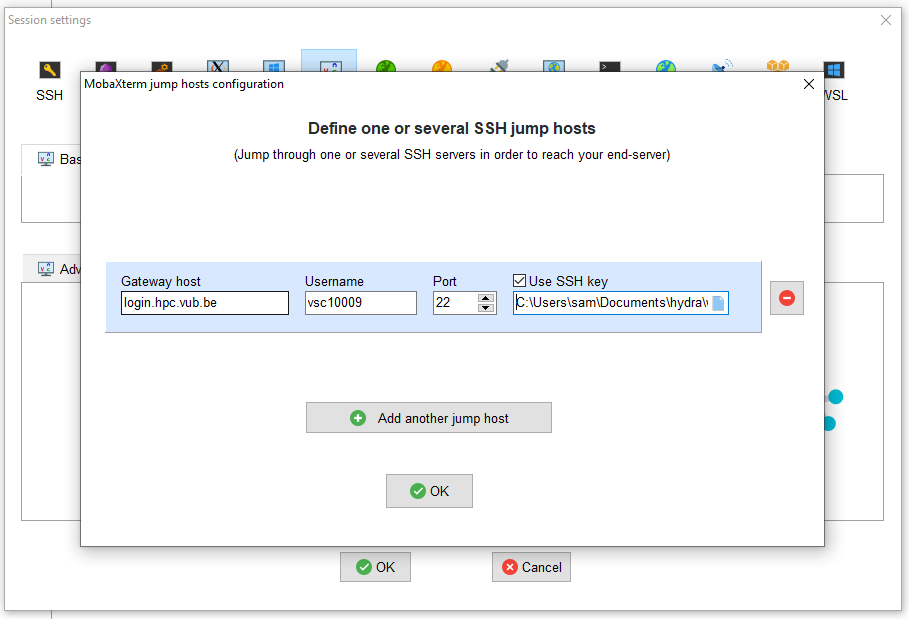
Network settingsand click the rectangular barSSH gateway (jump host). A new window MobaXterm jump hosts configuration should pop up:
Fill out:
Gateway host: login.hpc.vub.beUsername: vsc10xxx (replace with your VSC-ID)Port: 22Select
Use SSH keyand click the little file icon to browse to your private SSH key.Click
OK.
Back in the window Session settings, click
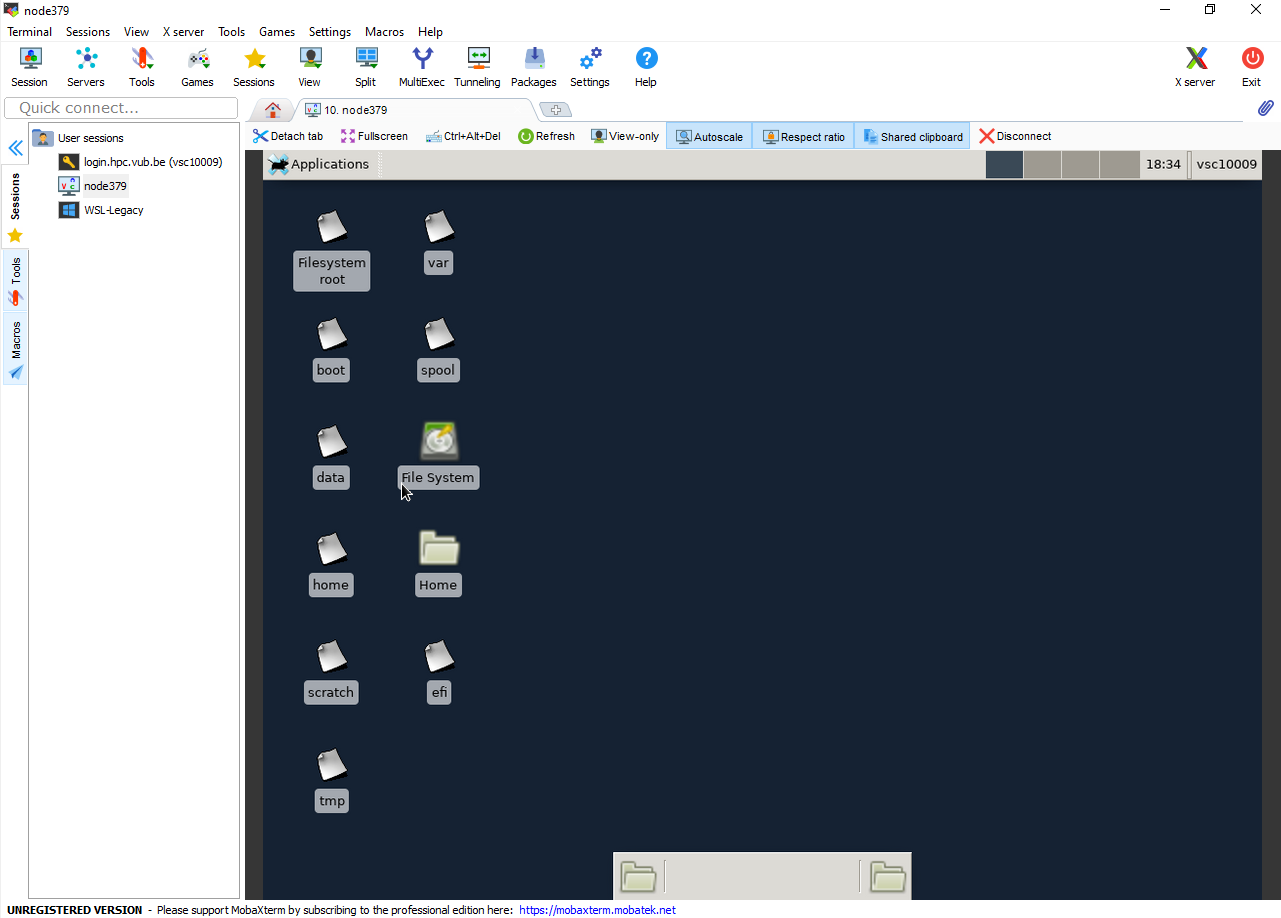
OK. A new window asking your password should pop up.Enter your VNC server password. The VNC session should now appear in a new tab inside the MobaXterm interface:

